Authordsezen

AWS instance metadata

Facebooktwittergoogle_pluslinkedinmailby feather

Just a simple best-practice for you to know in case you need to get instance related data during automation:

curl http://169.254.169.254/latest/meta-data/

For example, if you want to use the hostname in your automation, just use the output:

$ curl http://169.254.169.254/latest/meta-data/hostname

WordPress and CloudFront Access-Control-Allow-Origin problem a.k.a. CORS

Facebooktwittergoogle_pluslinkedinmailby feather

You may be having the following type of error after you enable CDN on your WordPress:

Font from origin 'http://xxxxxxx.cloudfront.net' has been blocked from loading by Cross-Origin Resource Sharing policy: No 'Access-Control-Allow-Origin' header is present on the requested resource. Origin 'http://www.domain.com' is therefore not allowed access.

That's because you do not have the "Access-Control-Allow-Origin" header set by the web-server of the origin, which is Apache or Amazon S3.

You can verify this with the following command and you will not see the header:

curl -I -s -X GET -H "Origin: www.domain.com" http://xxxxxx.cloudfront.net/yyy.png

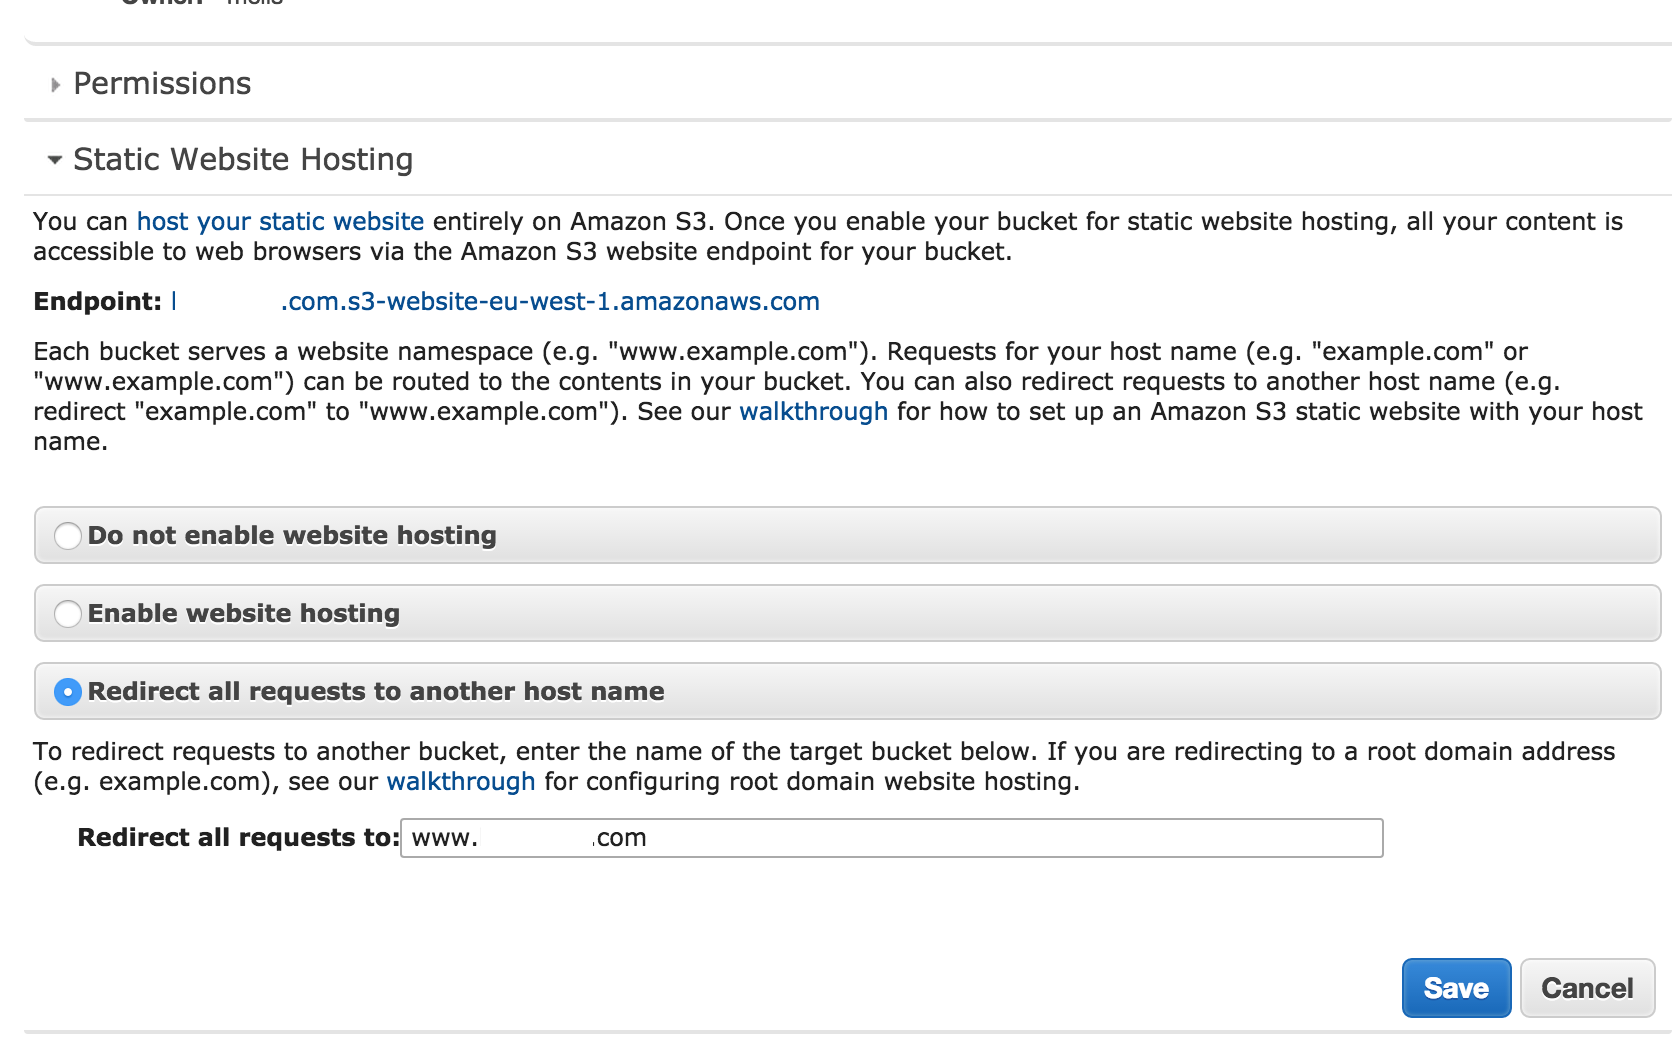
1- With S3: In order to set that header in S3, refer to the AWS Documentation.

2- Without S3: 

2-a: CloudFront:

– Edit Behaviors

– Change "Allowed HTTP Methods" to GET, HEAD, OPTIONS, PUT, POST, PATCH, DELETE

– Change "Forward Forward" headers to "Whitelist"

– Add "origin" to Whitelist headers

2-b: Apache

You need to You just need the following to be added under the Document section in your httpd.conf:

Header set Access-Control-Allow-Origin "*"

and gracefuly restart your http server:

apachectl -k graceful

Check if the header appeared with the "curl" command previously we used.


HTTP/1.0 200 OK

Content-Type: image/png

Content-Length: 299245

Date: Wed, 16 Dec 2015 22:28:00 GMT

Server: Apache

X-Frame-Options: SAMEORIGIN

Last-Modified: Wed, 09 Dec 2015 15:07:22 GMT

ETag: "490ed-52678727d1480"

Accept-Ranges: bytes

Access-Control-Allow-Origin: *

X-Cache: Miss from cloudfront

X-Amz-Cf-Id: e14A-xV0D-ajm0S7wLe696YombjT8zKCmbr0LL8NmqlMarArJo1jnw==

X-Cache: MISS from 213.155.126.5

X-Cache-Lookup: MISS from 213.155.126.5:3128

Via: 1.1 cxxxxxx4.cloudfront.net (CloudFront), 1.0 213.155.126.5 (squid/3.1.23)

Connection: keep-alive

Building Microservices

Facebooktwittergoogle_pluslinkedinmailby feather

I have recently finished reading Sam Newman's "Building Microservices" book, from which i learned so many topics that were questions in my mind towards building micro services.

Micro Services

Although there are so many lessons i learned, but the most remarkable ones are:

– Services are communicated between each other on service-level rather than via DB

– Although there is no restriction, but having seperate DB for each/set of services is ok

– Service orchestration and scaling

– Breaking monolith into pieces


git repository from scratch

Facebooktwittergoogle_pluslinkedinmailby feather


I just need to bring up a git repo from scratch and push to github on a computer where there was initially

– NO git repo

– NO ssh keys to connect to github


So here are the straightforward steps:

1. Initializing git repo on the directory where you want:

git init

2. Adding all the files to the git repository:

git add .

3. First commit:

git commit -m "First commit"

4. Adding a remote repository:

git remote add origin [email protected]/funkydorian/ansible.git

5. You can check the effect of the previous step by:

cat .git/config

6. Check if you have ssh keys in order to connect to github:

ls ~/.ssh/id_rsa

7. If yes, check if you can connect to github:

ssh -T [email protected]

7. If not, create the keys:

ssh-keygen -t rsa -b 4096 -C "[email protected]"

8. Add your private key identities to the authentication agent:

ssh-add ~/.ssh/id_rsa.pub

9. Copy the key to your clipboard:

pbcopy < ~/..ssh/id_rsa.pub

10. Login to your github.com from your browser

Settings –> SSH Keys –> Add Key –> Paste the content of id_rsa.pub

11. Create the repository on github.com

12. Check again if you can connect to github:

ssh -T [email protected]

You must see the output like:

"You've successfully authenticated…."

13. Try to push to github:

git push -v origin master


n11.com DevOps Presentation

Facebooktwittergoogle_pluslinkedinmailby feather


The images are from today's n11.com DevOps presentation


n11 DevOps 20151026_173203

Docker –link

Facebooktwittergoogle_pluslinkedinmailby feather

I was trying to find a use-case of the "–link" functionality in Docker in terms of a "Service Discovery" perspective and i found the following repo:

https://github.com/benschw/docker-service-discovery-with-links

Seems some way through… I will be going deeper, any comments are appreciated….


Gelisim Platformu DevOps ALM Workshop

Facebooktwittergoogle_pluslinkedinmailby feather


We have spent valuable time in Gelisim Platformu, who invited me to conduct a DevOps ALM workshop.

The two teams followed a different path towards ALM by taking business requirements from me.

Hope to meet you some time later soon!

DevOps Gelisim Platformu DevOps Gelisim Platformu DevOps Gelisim Platformu DevOps Gelisim Platformu DevOps Gelisim Platformu DevOps Gelisim Platformu

URL Redirection on AWS Route53 and Cloudflare

Facebooktwittergoogle_pluslinkedinmailby feather


Redirecting your domain.com to www.domain.com does not requiere anymore to have a host/virtualhost and html redirection file, that was 10 years before!

Here is the practical way for AWS Route53 and Cloudflare:

1. AWS Route53:

Steps:

– Go to S3

– Create a new bucket named "domain.com"

– Properties –> Static WebSite Hosting

– Redirect all requests to another hostname

– www.domain.com should filled automatically

– Click "Save"

AWS Route53 URL Redirection

– Goto Route53

– Edit A record

– Select Alias Yes

– Select the s3 bucket you already created

– Click Yes

AWS Route53 S3 Alias URL Redirection

2. CloudFlare:

For Cloudflare it is much more easy, here it is:

– Open "Page Rules" tab

– Add new rule with "URL pattern "domain.com/*"

– Change Forwarding to On

– Enter Forwarding URL as "htttp://www.domain.com/$1"

– Choose 301 redirection

– Click "Add Rule"

The final should be as below:

Cloudflare URL Redirection 301

Türk Telekom Agile Zirvesi 2015

Facebooktwittergoogle_pluslinkedinmailby feather


I have done a brief introduction to DevOps Culture, Principles and some tools during Turk Telekom Agile Zirvesi 2015.

The link to my presentation is here


ttdevops_05 tt_devops04 tt_devops03 tt_devops02 tt_devops01

AWS Elastic Beanstalk the security group having id does not exist problem

Facebooktwittergoogle_pluslinkedinmailby feather

AWS Elastic Beanstalk

During playing with AWS EB, i noticed that somehow the Security Group from the previous environment was inherited by the new environment. This creates problem, when you want to terminate the old environment, as the security group already exist on another environment. That’s why i deleted the security group from the new environment. Since, i deleted it from the new environment, i cannot make deployment on the new environment because it gives the following error:

Failed Environment update activity. Reason: Configuration validation exception: Invalid option value: ‘sg-8712f4e3’ (Namespace: ‘aws:autoscaling:launchconfiguration’, OptionName: ‘SecurityGroups’): The security group having id ‘sg-8712f4e3’ does not exist

In order to overcome this, you need to change the EB Security Group from AWS CLI, you cannot do it from AWS Web Console.

Considering you have already AWS CLI installed (http://docs.aws.amazon.com/cli/latest/userguide/installing.html) , you need to the following command in order to change the Security Group:,

aws elasticbeanstalk update-environment –environment-name –option-settings Namespace=aws:autoscaling:launchconfiguration,OptionName=SecurityGroups,Value=””


visited 41 states (18.2%)

Follow me on Strava